 |


| Office-M > SoftwareEntwicklung > ImageBrowser > Features |
Introduction | Exif-Feature | Sets | Foto-Album | Cache | Seperate Modules | Multiple Plattforms | Languages | Image-Viewing-Features | Menue-Key-Aware
Introduction:


										-------------


										ImageBrowser was developed special for the Sharp Zaurus SL-5500. It is used to show image-files on the device. ImageBrowser DOESN'T use the method of the Zaurus to look for images on all medias (RAM, CF-Card, SD-/MMC-Card) and to show them eventually sorted by categories. The concept of ImageBrowser is "path and filter". This means that image-files are shown which are located in a specific path and meet a specific filter.
Example:
Path:   "/mnt/card/Documents/image/jpeg"


									Filter: "*.jpg"
^
										Exif-Feature:


										-------------


										With digital-cameras it is usual to save so called EXIF-information in image-files. Beside exposure-data of the image (exposure-time, flash use, ...) EXIF-information contains the date and time of the exposure.


										There are a lot of programms that can deal with this information and it is a good idea to name image-files according to date and time of exposure.


										Tip:
http://www.sentex.net/~mwandel/jhead
An image-file with exposure-time
"10. August 2003, 14:42:01"
could have the following name:
"2003_0810_144201AA.jpg"
A filter for all files from august 2003 could look like this:
"2003_08*.jpg"
^
										Sets:


										-----


										The combination of path and filter is known as "set" and can be saved with an arbitrary name in ImageBrowser.
Example:
Path:   "/mnt/card/Documents/image/jpeg"


									Filter: "2003_08*.jpg"


									Set:    "August 2003"
The number of pathes, filters and sets is only limited by avaiable memory.
										Foto-Album:


										-----------


										ImageBrowser follows the asumption, that you want to show a specific set of images again quickly and therefore shows - as soon as there is a valid combination of path and filter - a preview of the images as thumbnails ordered in a table. These images are scaled.
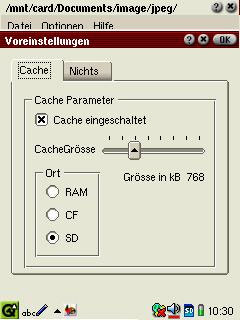
										Cache:


										------


										As scaling (especially for large images) is a time consuming step, it is possible to save thumbnails in a cache. This means that you will need less time (to show) but more storage space.
										Seperate Modules:


										-----------------


										ImageBrowser consists of the following applications
o DirectoryBrowser


									o ImageBrowser


									o ShowImage
These can be used seperately.


										The start-program is "DirectoryBrowser". If there is allready a valid combination of path and filter defined ImageBrowser will be called directly to show the thumbnails of the images.


										It is also possible to call ImageBrowser from a shell with filename(s) as parameter(s). So it is possible to "program" a "fixed album".


										"ShowImage" can also be called from a shell with a filename as parameter. I use this feature to view gnuplot-Images.
Example:
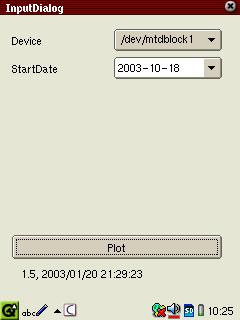
Input-dialog created in Python / PyQt.
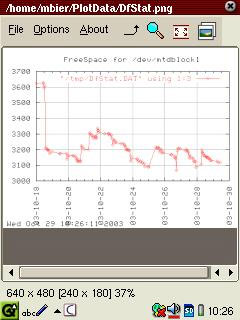
Result as "PNG"-file shown with "ShowImage".
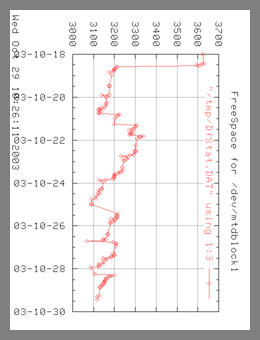
Result rotated in FullScreen-mode.
										Multiple Plattforms:


										--------------------


										As mentioned above, ImageBrowser was developed special for the Sharp Zaurus SL-5500.


										Is is programmed in Python with PyQt and uses the QT-Interface of Trolltech. This means it is also useable for Linux-PCs.
										Languages:


										----------


										At the time of this writing there is english and german avaiable. If someone is interested in writing translations for other languages, please contact me by e-mail at "markus.zaurus AT office-m.at".
										Image-Viewing-Features:


										-----------------------
o Rotate by 90 degrees


									o Turn by 180 degrees


									o Zoom


									o FullScreen


									o DiaShow


									o Play Movie (experimental)
^
										Menu-Key-Aware:


										---------------


										During developing of ImageBrowser attention was payed, that (nearly) all functions can be executed with the menu- and cursor-keys.
o DirectoryBrowserLeft, right,
up, down ............... Tree-navigation
Center (Select) ........ Call ImageBrowser
o ImageBrowserLeft, right,
up, down .............. Table-navigation
Center (Select) ....... Call ShowImage
o ShowImage:Left .................. Previous image
Right ................. Next image
Up .................... Zoom in
Down .................. Zoom out
Center (Select) ....... FullScreen-on/-off
Last Update: